Showing posts with label Earning. Show all posts

Sunday, 21 November 2021

ওয়েব ডেভেলপমেন্ট কি? | What is web development?

 ওয়েব ডেভলপমেন্ট কি? 

ওয়েব ডেভলপমেন্ট হলো ইন্টারনেটে ওয়েবসাইট বা অ্যাপ্লিকেশন তৈরির প্রক্রিয়া বা কোন ব্যক্তিগত নেটওয়ার্ক যেমন ইন্ট্রানেট হিসাবে পরিচিত। 

ওয়েবসাইটের ডিজাইন কিন্তু এর কনসার্ন নয়, ওয়েবসাইট তৈরি এবং এর ফাংশনালিটি মেইন্টেইনের জন্য যে কোডিং, প্রোগ্রামিং এবং আনুষাঙ্গিক কাজ— এগুলোই ওয়েব ডেভেলপমেন্ট।

সবচেয়ে সরল স্ট্যাটিক ওয়েবপেজ থেকে শুরু করে সোশ্যাল মিডিয়া (ফেসবুক,ইন্সটাগ্রাম, টুইটার) প্লাটফর্ম বা অ্যাপ, ই-কমার্স (আলিবাব,ইভালি,দারাজ) ওয়েবসাইট কিংবা অনলাইন এনসাইক্লোপিডিয়া— যত অনলাইন টুল আমরা প্রতিদিন ব্যবহার করছি এই সবকিছু গড়ে তোলার কাজটাই হল ওয়েব ডেভেলপমেন্ট।

অনেক সময় আমরা ওয়েব ডিজাইনিং কে ওয়েব ডেভেলপমেন্টের সাথে গুলিয়ে ফেলি। তবে এই দুইটি জিনিষের মধ্যে পরিষ্কার পার্থক্য রয়েছে৷ প্রোগ্রামিং এবং কোডিং এর মাধ্যমে ওয়েব ডেভেলপাররা প্রতিনিয়ত একটি ওয়েবসাইটকে চালু করে রাখে।

ওয়েব ডেভেলপমেন্টকে কত প্রকারে ভাগ করা যায়?

ওয়েব ডেভেলপমেন্ট এর পরিধি ব্যাপক হওয়ায় এর কাজের মধ্যেও ভিন্নতা রয়েছে। 

কাজের ধরন অনুযায়ী ওয়েব ডেভেলপমেন্টকে মূলত দুইটি ভাগে ভাগ করা যেতে পারে। 

এগুলো হলোঃ

  • ক্লায়েন্ট সাইড কোডিং (ফ্রন্ট এন্ড)
  • সার্ভার-সাইড কোডিং (ব্যাক এন্ড)
চলুন এখন এগুলো সম্পর্কে কিছু বিস্তারিত জেনে নেওয়া যাক।


ক্লায়েন্ট সাইড কোডিং (ফ্রন্ট এন্ড) কি?


ক্লায়েন্ট সাইড স্ক্রিপ্টিং বলতে মূলত ওয়েবসাইটের ইউজারদের প্রান্তকেই নির্দেশ করে। একে অনেক সময় ফ্রন্ট এন্ড ডেভেলপমেন্টও বলা হয়ে থাকে। ক্লায়েন্ট সাইড বা ফ্রন্ট এন্ড ডেভেলপমেন্ট সেসব বিষয়কে নির্দেশ করে যেগুলোতে আমরা ব্যবহারকারীরা সরাসরি সম্পৃক্ত।


ক্লায়েন্ট সাইড কোডিং (ফ্রন্ট এন্ড)


ফ্রন্ট-এন্ড ডেভেলপার একটি ওয়েবসাইট বা অ্যাপ্লিকেশনের ফ্রন্ট-এন্ডের কোড করেন। অর্থাৎ তারা ব্যাক-এন্ডের ডেটাকে  ব্যবহারকারীদের জন্য সহজে বোধগম্য, দৃষ্টিনন্দন এবং ফাংশনাল করে গড়ে তোলেন। তারা ওয়েব ডিজাইনারদের দেওয়া ডিজাইনকে এইচটিএমএল (HTML), সিএসএস (CSS) বা জাভাস্ক্রিপ্ট (JavaScript)-এর মাধ্যমে বাস্তব রূপ দেন।


ফ্রন্ট-এন্ড ডেভেলপার  ওয়েবসাইটগুলো এমনভাবে কোড করেন যাতে বিভিন্ন স্ক্রিন সাইজ এবং ডিভাইসের ধরণের সাথে সেগুলো এডাপ্টেবল হয় ( Mobile Friendly) , ফলে ইউজাররাও সবখানে সন্তোষজনক এক্সপেরিয়েন্স পান।


ফ্রন্ট-এন্ড ডেভেলপাররা একটি ওয়েবসাইটের লে-আউট, তার ইন্টারেক্টিভ এবং নেভিগেশনাল এলিমেন্ট যেমন বাটনস, স্ক্রলবার, ইমেজ, অভ্যন্তরীণ বিভিন্ন লিংক— এসবকিছু মিলেয়ে একটি ওয়েবসাইটে বাস্তবায়িত করেন।


সার্ভার-সাইড কোডিং (ব্যাক এন্ড) কি?

আপনি শুটিং দেখেছেন কখনো? আমরা কিন্তু শুধু  সিনেমায় কি দেখাচ্ছে ওটাই দেখি বিহাইন্ড হ্যা দিনে কি হইছেছিল দেটা কিন্তু দেখতে পাইনা।
তেমন ভাবে যেকোনো ওয়েবসাইটের ভেতরে বা  বিহাইন্ড দ্য সিনে যা চলে সেটিকে বলা হয় সার্ভার সাইড স্ক্রিপ্টিং। সার্ভার সাইড স্ক্রিপ্টিংকে অনেক সময় ব্যাক এন্ড ডেভেলপমেন্টও বলা হয়ে থাকে।

এই ব্যাক এন্ড একটি ওয়েবসাইটের অপরিহার্য অংশ কিন্তু যেটি ওয়েবসাইটের  ব্যাবহারকারি বা ইউজাররা তা দেখতে পায়না।

সার্ভার-সাইড কোডিং (ব্যাক এন্ড)


ব্যাক-এন্ড ডেভেলপার ফ্রন্ট-এন্ডকে সচল রাখার জন্য যে ইনফাস্ট্রাকচার দরকার তা তৈরি ও রক্ষণাবেক্ষণ করেন। 

এর মূলত তিনটি অংশ বলা যায়— সার্ভার, অ্যাপ্লিকেশন, ডেটাবেজ।

ওয়েবসাইটের ভেতরের ডেটা ও তথ্যসমূহ যথাযথভাবে সংরক্ষণ এবং গোছানো রাখে এবং ক্লায়েন্ট বা ইউজারদের সাইডে সবকিছু সাবলীলভাবে চালানো এর পূর্ন দায়িত্ব থাকে সার্ভার সাইডের উপর।

সাধারণত ব্যাক-এন্ড ডেভেলপমেন্ট টাস্কে থাকে ডেটাবেজ তৈরি, ইন্টিগ্রেট ও রক্ষণাবেক্ষণ করা, ব্যাক-এন্ড ফ্রেমওয়ার্ক ব্যবহার করে সার্ভার-সাইড সফটওয়্যার তৈরি, কন্টেন্ট ম্যানেজমেন্ট সিস্টেম তৈরি ও ইমপ্লিমেন্ট, ওয়েব সার্ভার টেকনোলজি আর অপারেটিং সিস্টেমের সাথে যথাযথভাবে কাজ করা।


আমরা যখন ওয়েব ব্রাউজারে কোনো ফরমে তথ্য দেই, সেটি তৎক্ষনাৎ সার্ভার সাইডের প্রান্তে চলে যায়। সার্ভার সাইড সেটিকে যাচাই করে আবার ক্লায়েন্ট সাইডে পাঠিয়ে দেয়। মূলত এভাবেই একটি ওয়েবসাইট কাজ করে থাকে।


কিভাবে ওয়েব ডেভেলপমেন্ট শিখবো? 

অনেকেই ভাবতে পারেন ওয়েব ডেভেলপার হতে বোধহয় একাডেমিক ডিগ্রির প্রয়োজন, তবে প্রকৃতপক্ষে ওয়েব ডেভেলপমেন্ট শেখার জন্য সবচেয়ে বেশি প্রয়োজন দক্ষতার এবং নিজের ইচ্ছাশক্তি।সেই দক্ষতা অর্জনের জন্য আপনি শিখতে পারেন অনলাইনেই। 

তবে অনলাইনের মাধ্যমে ওয়েব ডেভেলপমেন্ট শেখার ক্ষেত্রেই আপনাকে টাকা খরচ করতে হবে। 


ওয়েব ডেভেলপমেন্ট শেখার আগে প্রয়োজনীয় সবকিছু তো ইতোমধ্যে জেনেই গেছেন।

এখন ইচ্ছা করলে নিজেও Codeacademy এবং w3schools এর  মতো কিছু ওয়েবসাউটের মাধ্যমে বিনামূল্যেও এইচটিএমএল, সিএসএস এবং জাভাস্ক্রিপ্ট টিউটোরিয়াল গুলো শিখে নিতে পারবেন ।

তাছাড়া আপনারা যারা যারা অনলাইনে এইচটিএমএল, সিএসএস এবং PHP শেখার প্রস্তুতি নিচ্ছেন, এর সাথে যাদের ক্ষেত্রে ওয়েব প্রোগ্রামিং শেখার খুব আগ্রহ আছে, বা ওয়েব ডেভেলপমেন্ট শেখা শুরু করতে চাইছেন তাঁরা সংগ্রহে রাখতে পারেন নিচের ওয়েবসাইটগুলোকে লক্ষ্য রাখতে পারেন।


এছাড়াও আপনি অনলাইনের বিভিন্ন  রিসোর্স থেকেও শিখতে পারেন কিন্তু সমস্যা হচ্ছে অনলাইনের এত এত রিসোর্স আপনাকে দিশেহারা করে দিতে পারে।


ইন্টারনেটে কন্টেন্ট খোঁজার ক্ষেত্রে আপনাদের জন্য সবচেয়ে বড় পরামর্শ হচ্ছে সার্চ করতে শিখুন। আপনি ইন্টারনেটে যেকোন তথ্য যত দক্ষতার সাথে, যত দ্রুত খুঁজে বের করতে পারবেন।
আপনার শেখার সুযোগটাও তত বিস্তৃত হবে। বিনামূল্যে কোনো কিছু শেখার জন্য ইন্টারনেটের বিকল্প নেই!


সার্চ করা শিখলে সহজেই আপনি যা শিখতে চান বা জানতে চান ইন্টারনেটে সার্চ করলে হাজার হাজার রিসোর্স পেয়ে যাবেন।

 সুতরাং, যারা ওয়েব ডেভেলপার হতে চান বা ওয়েব ডেভেলপিং শুরু করতে চান তাদের এ সম্পর্কিত সকল পড়াশোনার জন্য ইন্টারনেটে রিসোর্স খুঁজে পাবেন।

ওয়েব ডেভেলপমেন্ট এর ভবিষ্যত কি?

ইন্টারনেট এর জগতের শুরু বা শেষ বলতে আসলে কিছু নেই,এর পরিধি অনুমানের বাহিরে। ওয়েবসাইটও এমন একটি জায়গা যার শুরু আছে কিন্তু শেষ নেই। সুতরাং ওয়েবসাইট ডেভেলপমেন্ট এর কাজের ক্ষেত্রেও তাই সম্ভাবনাও অনেক বেশি!


আপনি যদি একটি টিমের সাথে একটু কম স্বাধীনতাতেও কাজ করতে স্বচ্ছন্দ হন এবং স্ট্যাবল ইনকাম সোর্স পছন্দ করেন, কোনো ফার্মে ফুল-টাইম পজিশন নিলে আপনার জন্য তা সুবিধাজনক হবে।


অনলাইনে একটু খুঁজলেই দেখবেন অনেক কোম্পানি খুঁজছে ফুল-টাইম ওয়েব ডেভেলপার। আর স্বাধীনতা চাইলে এবং নিজের সাফল্য সম্পূর্ণই নিজের করে নিতে চাইলে ফ্রি-ল্যান্সার হিসেবেও কাজ করতে পারেন। প্রতিনিয়তই বিভিন্ন প্রতিষ্ঠানের ফ্রিল্যান্স ওয়েব ডেভেলপার প্রয়োজন হয়।

কিছু অভিজ্ঞতা অর্জনের পর অনেকে কনসাল্টেন্ট হিসেবেও কাজ করতে পারেন। সময়ের সাথে স্কিল বাড়াতে থাকলে আপনার ডিমান্ড কখনোই শূন্য হবে না।


সারাবিশ্বেই বর্তমানে বিভিন্ন জনপ্রিয় মার্কেটপ্লেস গড়ে উঠেছে। এগুলোর মধ্যে আপওয়ার্ক, ফ্রিল্যান্সার, ফাইভার ইত্যাদি অন্যতম। জনপ্রিয় অনলাইন মার্কেটপ্লেস ওডেস্কে প্রায় সবসময়ই ওয়েব ডেভেলপমেন্ট নিয়ে হাজার হাজার ধরনের  কাজ থাকে।


ফ্রিল্যান্সারে রয়েছে ২০  হাজারেরও বেশি ওপেন জব। এদের প্রজেক্টে ঘন্টা প্রতি গড় রেট ২৫ ডলার থেকে শুরু করে ১৫০ ডলার পর্যন্ত হয়ে থাকে। উত্তরোত্তর এই রেট শুধু বাড়ছেই। কাজের প্রবৃদ্ধি দেখলেই বুঝা যায় কাজের চাহিদা কত বেশি বাড়ছে। আশা করি বুঝতেই পারছেন, ক্যারিয়ারের ভবিষ্যত কেমন হতে পারে!


শেষ কথাঃ

আপনি হয়তো জানেন,ওয়েব ডেভেলপমেন্ট বর্তমান বিশ্বের সবচেয়ে বেশি ডিমান্ডিং পেশাগুলোর মধ্যে একটি৷ এই লেখাটির  শুরু থেকে শেষ পর্যন্ত পড়ে থাকলে আপনি ইতোমধ্যেই ওয়েব ডেভেলপমেন্ট এর সব কিছুই হয়তো জেনে গেছেন।

Complete Web development Course with jhankar Mahabub


Monday, 9 March 2020

Free Online TV || Watch Free Online TV Channels In VLC Player


VLC is a open source software media player. Everyone use VLC for videos but few of you may know that you can Watch Free Online TV Channels In VLC Player.

VLC Streaming Overview

now you can easily stream online tv channels through VLC player .it’s simple just to install VLC player on your PC and follow these steps and enjoy watching your favourite programs on even at low speed. VLC is a simple fast and powerful media player. It plays almost everything Files, Discs, Webcams , Devices and Streams.The best thing about VLC player is that it runs on all platforms Windows, Linux, MAC OS X, Unix.

Watch Free Online TV Channels In VLC Player – Guide

Step#1

Open VLC media player. If you don’t have then Install VLC player on your PC here.
download button 

Step#2

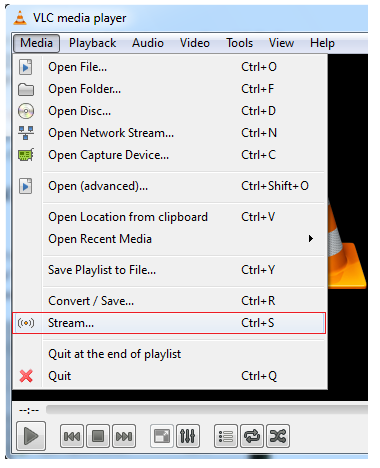
Go to the ‘MEDIA’ from MENU BAR and select ‘STREAM’.
Watch Free Online TV Channels In VLC Player
Step#3

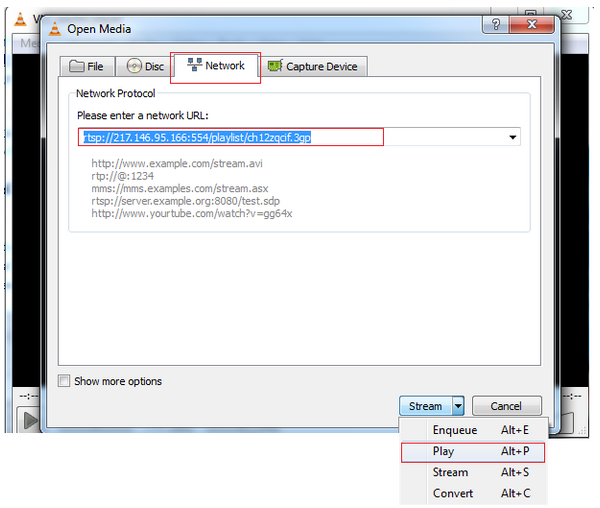
Now go to the third tab ‘NETWORK’ .Enter the URL of your favourite channel which you want to watch .
For Example: URL of B4U Music channel – rtsp://217.146.95.166:554/playlist/ch12zqcif.3gp
On the right side there is ‘Stream dropdown’. Select ‘PLAY’.
stream Online TV Channels In VLC Player
Now you have learnt how to stream free online channels in VLC media player. You can get URL of your favourite TV channels easily by simply search URL of your fav channel on Google. Enjoy Watching!

Streaming URLs of Other TV Channels

I have given multiple streaming address of TV channels in a text file. This can be downloaded from below button.

download button

Sunday, 1 March 2020

Build Your Own Currency Exchange Web App

Build Your Own Currency Exchange Web App in ~100 lines using CRA 


This tutorial describes how to create a simple currency exchange app in just about 100 lines of code using the Create React App boilerplate.

🛠️ Preparation

First, create the react app. I call it "rates".
$ yarn create react-app rates
Run the command in your root
$ yarn start
Your web app will be available on http://localhost:3000

⚓ Fetching the currencies rate

For currency exchange data we will use free API on exchangeratesapi.io
We will load the latest data of the currencies rates.
Install the swr and unfetch libraries. It helps to easily fetch API.
$ yarn add swr unfetch
Create the fetcher function outside the App component
// src/App.js
import React from "react";
import "./App.css";
import fetch from "unfetch";

const API_URL = "https://api.exchangeratesapi.io";

const fetcher = async path => {
  const res = await fetch(API_URL + path);
  const json = await res.json();
  return json;
};

// function App...
Add useSWR in App component to fetch data
import React from "react";
import "./App.css";
import fetch from "unfetch";
import useSWR from "swr";

 // API_URL = ...

 // const fetcher = ...

 function App() {
  const { data: currencies } = useSWR("/latest?base=EUR", fetcher);

  return <div>Welcome to your Currency exchange app!</div>;
 }
Now we have the currencies rates in currencies.rates variable.
To see the JSON data of currencies rates you can open the API url directly into your browser: https://api.exchangeratesapi.io/latest?base=EUR
The ?base=EUR query is used to get all rates relative to EUR currency.

💄 Add the UI

For ui, we will use the material-ui design system. Install it:
$ yarn add @material-ui/core
Create the UI for our currency exchange app in the App component.
// ...
import {
  Container,
  Paper,
  Grid,
  TextField,
  Select,
  MenuItem
} from "@material-ui/core";

// ...

function App() {
  const { data: currencies } = useSWR("/latest?base=EUR", fetcher);

  if (!currencies) {
    return null;
  }

  return (
    <Container className="currency-exchange-container" fixed>
      <h1>Currency exchange</h1>
      <Paper
        className="currency-exchange-paper"
        variant="outlined"
        elavation={1}
      >
        <Grid container spacing={3}>
          <Grid item xs={6}>
            <TextField type="number" />
          </Grid>
          <Grid item xs={6}>
            <TextField type="number" />
          </Grid>
          <Grid item xs={6}>
            <Select>
              <MenuItem value={"EUR"}>EUR</MenuItem>
              {Object.keys(currencies.rates).map((rate, key) => (
                <MenuItem key={key} value={rate}>
                  {rate}
                </MenuItem>
              ))}
            </Select>
          </Grid>
        </Grid>
      </Paper>
    </Container>
  );
}
Now, look at the following code snippet. We create the currency selection box by iterating over all possible rates from our API data. Since we fetch rates relative to EUR, so we should manually add the EUR item, because it doesn't exist in rates object.
  <Select>
    <MenuItem value={"EUR"}>EUR</MenuItem>
    {Object.keys(currencies.rates).map((rate, key) => (
      <MenuItem key={key} value={rate}>
        {rate}
      </MenuItem>
    ))}
  </Select>
When the currencies are not loaded, we just return null, because of currencies rates is undefined at that moment.
  if (!currencies) {
    return null;
  }
Add some styles to App.css
h1 {
  font-weight: 300;
  color: #636363;
  margin-bottom: 3rem;
}

.currency-exchange-container {
  display: flex;
  flex-direction: column;
  align-items: center;
  justify-content: center;
  height: 100vh;
}

.currency-exchange-paper {
  max-width: 350px;
  padding: 30px 30px 40px 30px;
}

.MuiInput-root {
  width: 100%;
}

⚙️ Add logic

Now we add the inputs state to our App component
function App() {
  const { data: currencies } = useSWR("/latest?base=EUR", fetcher);

  const [fromValue, setFromValue] = useState(1);
  const [toValue, setToValue] = useState(1);

  const [fromCurrency, setFromCurrency] = useState("EUR");
  const [toCurrency, setToCurrency] = useState("EUR");

  const handleFromCurrencyChange = e => {
    setFromCurrency(e.target.value);
  };

  const handleToCurrencyChange = e => {
    setToCurrency(e.target.value);
  };

  const handleFromValueChange = e => {
    setFromValue(parseFloat(e.target.value));
  };

  const handleToValueChange = e => {
    setToValue(parseFloat(e.target.value));
  };

  if (!currencies) {
    return null;
  }

  return (
    <Container className="currency-exchange-container" fixed>
      <h1>Currency exchange</h1>
      <Paper
        className="currency-exchange-paper"
        variant="outlined"
        elavation={1}
      >
        <Grid container spacing={3}>
          <Grid item xs={6}>
            <TextField
              type="number"
              value={fromValue}
              onChange={handleFromValueChange}
            />
          </Grid>
          <Grid item xs={6}>
            <TextField
              type="number"
              value={toValue}
              onChange={handleToValueChange}
            />
          </Grid>
          <Grid item xs={6}>
            <Select value={fromCurrency} onChange={handleFromCurrencyChange}>
              <MenuItem value={"EUR"}>EUR</MenuItem>
              {Object.keys(currencies.rates).map((rate, key) => (
                <MenuItem key={key} value={rate}>
                  {rate}
                </MenuItem>
              ))}
            </Select>
          </Grid>
          <Grid item xs={6}>
            <Select value={toCurrency} onChange={handleToCurrencyChange}>
              <MenuItem value={"EUR"}>EUR</MenuItem>
              {Object.keys(currencies.rates).map((rate, key) => (
                <MenuItem key={key} value={rate}>
                  {rate}
                </MenuItem>
              ))}
            </Select>
          </Grid>
        </Grid>
      </Paper>
    </Container>
  );
}
Also, add the two following functions for currency exchange
const convertFromTo = () => {
    const fromRate =
      fromCurrency === "EUR" ? 1 : currencies.rates[fromCurrency];
    const valueInEur = fromValue / fromRate;
    const toRate = toCurrency === "EUR" ? 1 : currencies.rates[toCurrency];
    setToValue(valueInEur * toRate);
  };

  const convertToFrom = () => {
    const toRate = toCurrency === "EUR" ? 1 : currencies.rates[toCurrency];
    const valueInEur = toValue / toRate;
    const fromRate =
      fromCurrency === "EUR" ? 1 : currencies.rates[fromCurrency];
    setFromValue(valueInEur * fromRate);
  };
One function converts currencies forward, and other - backward. In both functions, firstly, we convert currencies to EUR, because all rates we fetched from API are relative to euros.
The last thing is to add the React hooks which run the rates exchange after the input change.
  useEffect(() => {
    convertFromTo();
  }, [fromValue, toCurrency]);

  useEffect(() => {
    convertToFrom();
  }, [toValue, fromCurrency]);
Here is a full App.js file
import React, { useState, useEffect } from "react";
import "./App.css";
import fetch from "unfetch";
import useSWR from "swr";
import {
  Container,
  Paper,
  Grid,
  TextField,
  Select,
  MenuItem
} from "@material-ui/core";

const API_URL = "https://api.exchangeratesapi.io";

const fetcher = async path => {
  const res = await fetch(API_URL + path);
  const json = await res.json();
  return json;
};

function App() {
  const { data: currencies } = useSWR("/latest?base=EUR", fetcher);

  const [fromValue, setFromValue] = useState(1);
  const [toValue, setToValue] = useState(1);

  const [fromCurrency, setFromCurrency] = useState("EUR");
  const [toCurrency, setToCurrency] = useState("EUR");

  const handleFromCurrencyChange = e => {
    setFromCurrency(e.target.value);
  };

  const handleToCurrencyChange = e => {
    setToCurrency(e.target.value);
  };

  const handleFromValueChange = e => {
    setFromValue(parseFloat(e.target.value));
  };

  const handleToValueChange = e => {
    setToValue(parseFloat(e.target.value));
  };

  const convertFromTo = () => {
    const fromRate =
      fromCurrency === "EUR" ? 1 : currencies.rates[fromCurrency];
    const valueInEur = fromValue / fromRate;
    const toRate = toCurrency === "EUR" ? 1 : currencies.rates[toCurrency];
    setToValue(valueInEur * toRate);
  };

  const convertToFrom = () => {
    const toRate = toCurrency === "EUR" ? 1 : currencies.rates[toCurrency];
    const valueInEur = toValue / toRate;
    const fromRate =
      fromCurrency === "EUR" ? 1 : currencies.rates[fromCurrency];
    setFromValue(valueInEur * fromRate);
  };

  useEffect(() => {
    convertFromTo();
  }, [fromValue, toCurrency]);

  useEffect(() => {
    convertToFrom();
  }, [toValue, fromCurrency]);

  if (!currencies) {
    return null;
  }

  return (
    <Container className="currency-exchange-container" fixed>
      <h1>Currency exchange</h1>
      <Paper
        className="currency-exchange-paper"
        variant="outlined"
        elavation={1}
      >
        <Grid container spacing={3}>
          <Grid item xs={6}>
            <TextField
              type="number"
              value={fromValue}
              onChange={handleFromValueChange}
            />
          </Grid>
          <Grid item xs={6}>
            <TextField
              type="number"
              value={toValue}
              onChange={handleToValueChange}
            />
          </Grid>
          <Grid item xs={6}>
            <Select value={fromCurrency} onChange={handleFromCurrencyChange}>
              <MenuItem value={"EUR"}>EUR</MenuItem>
              {Object.keys(currencies.rates).map((rate, key) => (
                <MenuItem key={key} value={rate}>
                  {rate}
                </MenuItem>
              ))}
            </Select>
          </Grid>
          <Grid item xs={6}>
            <Select value={toCurrency} onChange={handleToCurrencyChange}>
              <MenuItem value={"EUR"}>EUR</MenuItem>
              {Object.keys(currencies.rates).map((rate, key) => (
                <MenuItem key={key} value={rate}>
                  {rate}
                </MenuItem>
              ))}
            </Select>
          </Grid>
        </Grid>
      </Paper>
    </Container>
  );
}

export default App;

✨ Finished!

Congratulations! You have done the currency exchange app using the CRA (Create React App).
The full source code you can find in my repository epranka/rates.


Saturday, 29 February 2020

Earn Bitcoin, Bitcoin Cash, Dogecoin, Litecoin and Dash for free

Coinpot, the microwallet for the best faucets ever


The world of cryptocurrencies is interesting but complex at the beginning.
Bitcoin is an online and secure virtual currency. It is already accepted as a payment method by many many online and offline vendors. 
Collecting free small amounts of Bitcoin, as well as Ethereum, Litecoin and other Altcoins is a good way to start understanding how cryptocurrencies work.
Faucets are websites, generally full of advertising links, which allow you to earn small amounts of Bitcoin and Altcoin just by solving the captcha for the recognition (and exclusion) of any bots. Many faucets are just a waste of time because they do not pay or dispense too small amounts of cryptocurrencies.
After months of testing I chose a small number of faucet where to invest my time.
FreeBitcoin allow you to easily earn Bitcoin with a simple and fast interface. 
First of all, my advise is to sign up on the best microwallet for faucets, CoinPot.

CoinPot

You can thus accumulate Bitcoin, Litecoin, Dogecoin, BitcoinCash and Dash. You can also mine all these coins by passively using your computer’s CPU at the speed you prefer.
At this time there are six faucets connected to CoinPot:

*BIT FUN the best CoinPot faucet for Bitcoin. Claim every 3 minutes!

Play games, have fun, earn bitcoin! Claim every 3 minutes. Free withdrawals. 50% lifetime referral commission commission

*Bonus Bitcoinfaucet to get some Bitcoin for free. You can claim every 15 minutes. I strongly advise you to click on “Always receive the average claim amount” in the “Claim settings” because the random claim is always under the average. Free bitcoin faucet. Claim every 15 minutes. Receive up to 5,000 satoshi per claim. Automatic 5% DAILY BONUS. Free…
*Moon Bitcoin — a simple faucet to gain bitcoin every 5 minutes (recommended to claim every 30 minutes) Moon Bitcoin is a bitcoin faucet with a difference…YOU decide how often to claim! Whereas most faucets only allow you… 
moonbit.co.in


 *Moon Dogecoinanother faucet of the Moon family to earn Dogecoin every 5 minutes (here too I advise you to claim every 30 minutes) Moon Dogecoin is a dogecoin faucet with a difference…YOU decide how often to claim! Weekly payments. 25% referral… 

moondoge.co.in

*Moon Litecoin — another faucet of the Moon family to earn Litecoin every 5 minutes (here too I advise you to claim every 30 minutes)  Moon Litecoin is a litecoin faucet with a difference…YOU decide how often to claim! Weekly payments. 25% referral…

moonliteco.in

Moon Dashcoin another faucet of the Moon family to earn DASH every 5 minutes (here too I advise you to claim every 30 minutes) Whereas most faucets only allow you to claim once per hour or once per day, we allow you to claim as often or as little…

Moon Bitcoin Cash — another faucet of the Moon family to earn Bitcoin Cash every 5 minutes (here too I advise you to claim every 30 minutes)Whereas most faucets only allow you to claim once per hour or once per day, we allow you to claim as often or as little…

Earn BTC for Viewing Ads | BTCClicks BTCClicks is a paid-to-click (PTC) site where members can earn BTC for viewing ads and advertisers can target bitcoin


Earn Free bitcoin